


Your Cart is empty
USCG E-5 Petty Officer Second Class Collar Device – Blue Ripstop
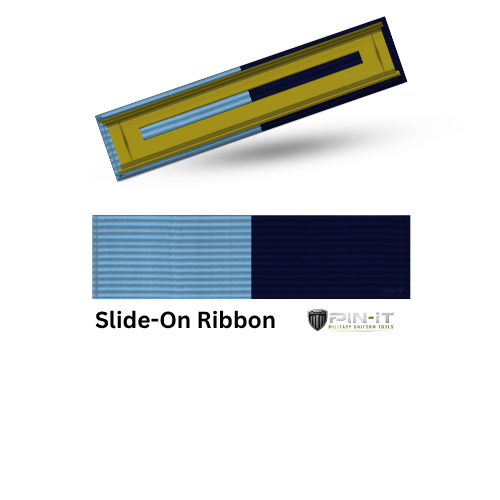
Complete your U.S. Coast Guard uniform with the USCG E-5 Petty Officer Second Class (PO2) Collar Device, embroidered on durable dark blue ripstop fabric for a clean, professional uniform appearance.
This sew-on Coast Guard rank insignia features the distinctive E-5 design with two gold chevrons and a silver shield, identifying the rank of Petty Officer Second Class. The detailed embroidery provides excellent definition and visibility, while the blue ripstop backing coordinates with the Coast Guard Operational Dress Uniform (ODU).
The insignia is embroidered directly onto the ripstop material with unfinished fabric edges, allowing the material to be properly positioned, folded, and sewn onto the uniform collar.
Features
- U.S. Coast Guard E-5 Petty Officer Second Class (PO2) collar insignia
- Traditional two gold chevrons with silver shield design
- Detailed embroidered construction
- Embroidered directly onto dark blue ripstop fabric
- Durable ripstop material
- Sew-on collar device
- Unfinished fabric edges for proper installation
- Designed for applicable USCG ODU uniforms
- Ideal for replacing worn or damaged Coast Guard rank insignia
Rank: Petty Officer Second Class (E-5)
Abbreviation: PO2
Branch: United States Coast Guard (USCG)
Material: Blue Ripstop Fabric
Design: Two Gold Chevrons with Silver Shield
Attachment: Sew-On
Insignia Type: Embroidered Collar Device
Whether you're setting up a new uniform or replacing worn insignia, this USCG E-5 Petty Officer Second Class collar device on blue ripstop provides the sharp, traditional appearance expected of Coast Guard uniform insignia.
USCG ODU Collar Device Placement & Sewing Instructions
For proper placement on the U.S. Coast Guard Operational Dress Uniform (ODU), embroidered collar rank insignia should be positioned according to U.S. Coast Guard Uniform Regulations.
Placement
- Bisect the Collar Point: Center the insignia along an imaginary line that equally bisects the angle of the pointed collar.
- 1 1/8-Inch Placement: Position the insignia so the base of the insignia, not the edge of the blue ripstop backing, is approximately 1 1/8 inches from the collar point.
- Match Both Collars: Carefully position both devices so their placement, angle, and orientation mirror one another.
- Check Before Sewing: Measure and compare both sides before permanently attaching either device.
Preparing the Ripstop Backing
- Fold, Do Not Cut: Fold the excess blue ripstop fabric underneath the embroidered device rather than cutting closely around the insignia. This creates a clean finished edge and helps prevent the material from fraying.
- Press the Folded Edges: Carefully press the folded ripstop edges with an iron before installation. This helps create crisp, even edges and makes the device easier to position and sew.
- Temporarily Secure the Device: Use straight pins or a small amount of temporary fabric adhesive to hold the device in position while checking placement.
- Compare Both Sides: Before stitching, confirm that both collar devices are positioned evenly and mirror one another.
Sewing Guidelines
- Use Matching Thread: Use blue thread that closely matches the color of the uniform and ripstop backing for a clean, professional appearance.
- Maintain Proper Stitching: Coast Guard uniform regulations specify that insignia may be machine stitched or hand stitched using thread the color of the uniform, with a minimum of six stitches per inch.
- Keep the Device Flat: Sew evenly around the folded edges, making sure the insignia remains flat, properly aligned, and securely attached.
- DIY or Professional Tailoring: If you have sewing experience and can accurately position the insignia, installation can be completed at home. For the most precise uniform appearance, consider using a professional tailor familiar with military uniforms.
Installation Tip
Prepare and press the folded ripstop backing before positioning the devices. Temporarily secure both devices and verify that each insignia follows the imaginary line bisecting the collar point. Confirm the 1 1/8-inch measurement from the collar point to the base of the insignia, as well as the orientation and symmetry of both devices, before permanently stitching them in place.
- Beware of Uniform Shrinkage: Always wash and dry a brand-new ODU uniform coat at least once before sewing on your collar devices. New uniform fabric can shrink slightly in the dryer, which will cause a tightly sewn patch to bunch up or pucker later.
- Secure the Alignment: Use straight pins or a tiny dab of temporary fabric glue to lock the patch on the 1 1/8-inch mark before sewing. Never wing the alignment by eye, as the slightest tilt will be noticeable on a pointed collar.
Product Specifications PDF
Official Technical Document & Assembly Guide